
Google has dropped its latest line of Pixel phones for 2025, and beyond being the company’s best phones yet, they’re brimming with great features worth taking advantage of.
Whether you’re upgrading or switching to Pixel for the first time, here you’ll find a shortlist of handy tips and tricks which will let you get more out of the Android 16-based experience offered up by the Pixel 10 series.
With a couple of exceptions, all of these feature walkthroughs apply to the entirety of the Pixel 10 line (the Pixel 10, Pixel 10 Pro, Pixel 10 Pro XL and Pixel 10 Pro Fold); however, there are a couple of upgrades covered that are exclusive to Google’s new Pro models only. Read on for the full run-down.
Turn Pro Res Zoom on or off
If you picked up the Pixel 10 Pro or 10 Pro XL, one of the most significant camera upgrades is Pro Res Zoom. Building on their predecessors’ Super Res Zoom, Pro Res Zoom boosts the maximum telephoto capture magnification from 30x to a whopping 100x.
Depending on how close to launch you bought your Pixel 10 Pro or 10 Pro XL, there’s a chance you don’t have Pro Res Zoom enabled by default. Similarly, as Pro Res Zoom adds the use of generative AI to enhance image fidelity above 30x (effectively ‘making up’ image details it ‘thinks’ should be present), not everyone will appreciate the feature’s inclusion as part of these new Pixels’ photographic experience.
As such, here’s how to enable/disable Pro Res Zoom on the Pixel 10 Pro line.
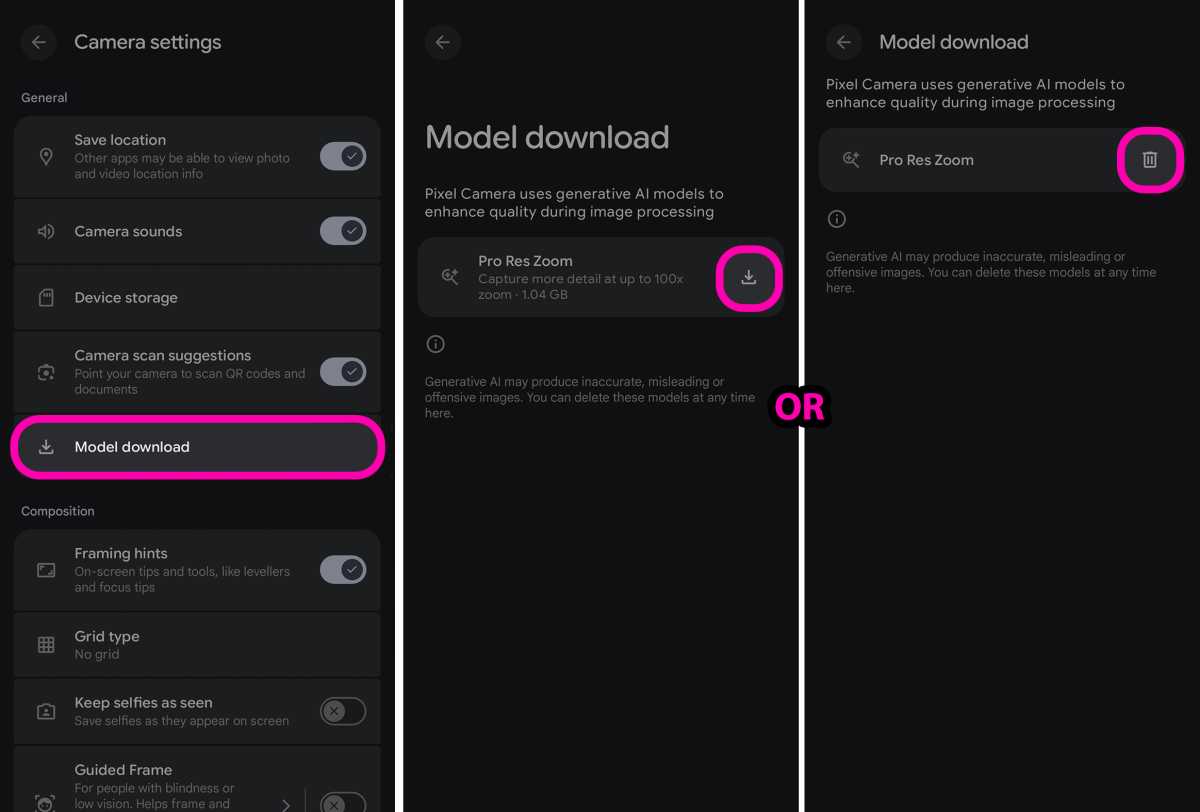
HOW? If your Pixel 10 Pro only zooms in as far as 30x out the box, you’ll need to download the Pro Res Zoom model. To do this, first open the Camera app, and from here, tap the Camera Settings icon (it features a cog symbol, partially obscured by a camera symbol). The icon should be in the bottom-left of the viewfinder when holding your phone in portrait.
On the subsequent card that pops up, tap the icon with the three dots in the top-right, just to the right of the words ‘Photo settings’.
You should now be looking at the full-screen ‘Camera settings’ menu. At the bottom of the ‘General’ section, you should see an entry called Model download. Tap on this.
If Pro Res Zoom isn’t yet downloaded onto your Pixel, the subsequent ‘Model download’ menu is where you’ll find the option to download it. Just tap on the downward arrow icon next to ‘Pro Res Zoom’ to download the feature.
Once downloaded, when you go back to the viewfinder, you should now find that you zoom all the way up to 100x.
Similarly, if you want to disable Pro Res Zoom completely, the downward arrow icon on the ‘Model download’ screen mentioned above will instead be a trash can icon. Tap the trash can and on the subsequent pop-up titled ‘Are you sure?’ tap Uninstall to completely remove Pro Res Zoom from your Pixel.
Note: If the 100x option doesn’t immediately appear after downloading the model, simply close the camera app completely, reopen it and try zooming in again.
Create a Calling Card
As part of Material 3 Expressive – the look and feel of Android 16 on the Pixel 10 series at launch – Google has added a slick new feature called Calling Cards.
Similar to iOS’ Contact Posters, Calling Cards act as personalised full-screen posters for key contacts in your address book, with the ability to choose specific photos and add custom font styles and colours too.
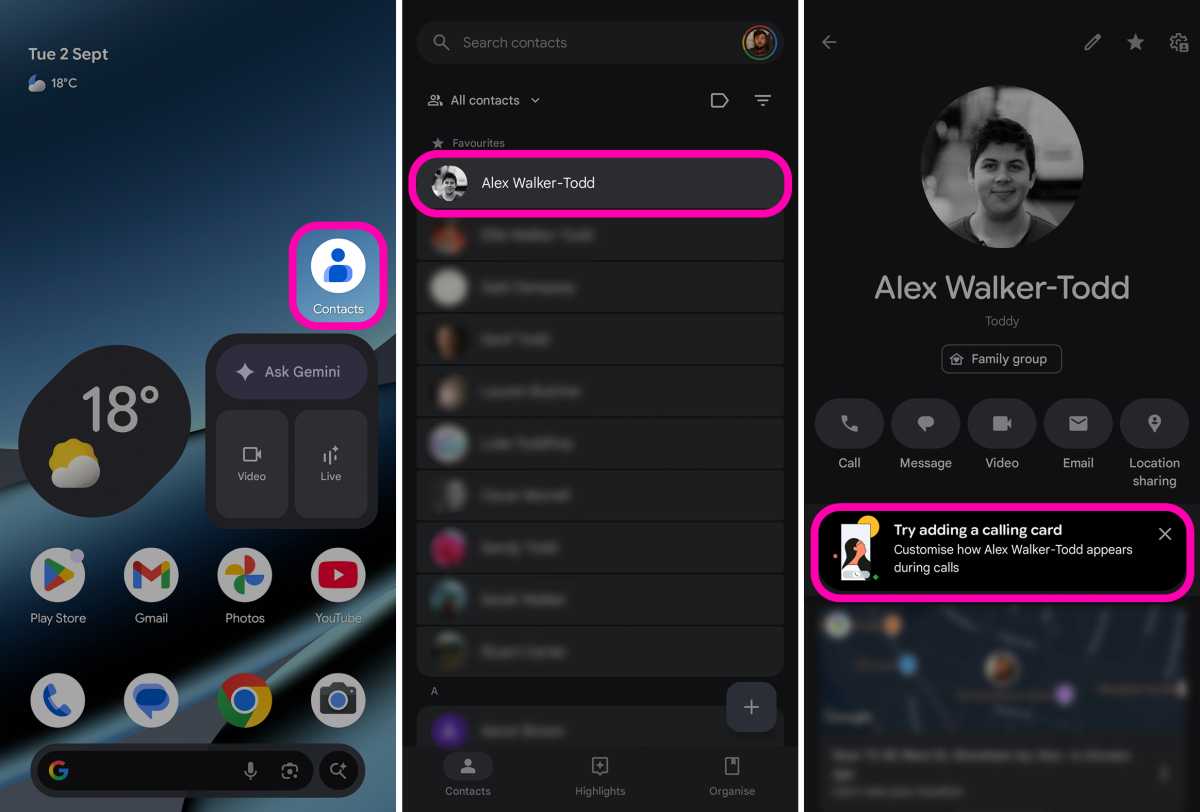
HOW? To create a calling card, open the Contacts app and tap on a contact from your address book that you want to make a calling card for. On the chosen contact’s screen, beneath the shortcuts to call, message, or email the contact, you should see a prompt box titled ‘Try adding a calling card’. Tap it.
On the subsequent calling card creation screen, choose from the Camera, Gallery and Google Photos buttons along the bottom to capture or select a suitable photo for the person whose contact card you’re creating.
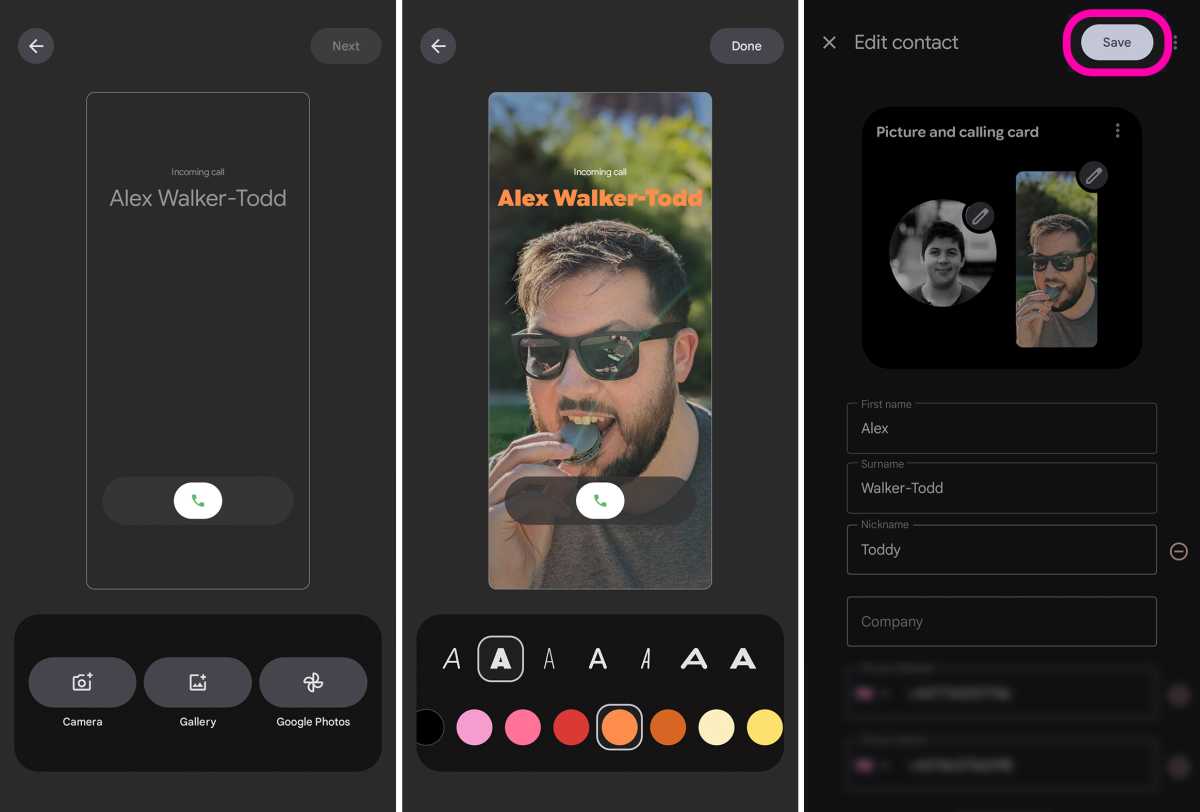
Once you’ve picked an image, you can move (by dragging with one finger) and resize (with two fingers) the image until it’s framed to your liking on the contact card.
When happy with the image’s positioning, you’ll also notice different font choices – represented by a series of ‘A’s – along the bottom of the screen. Tap on the different ‘A’s to apply different fonts to your chosen contact’s name. Next, pick a colour from the swatches underneath the font options.
Once you’re happy with both of these details, hit Done in the top-right of the screen. You’ll then be taken back to the ‘Edit contact’ screen, at which point you can tap Save in the top-right to save your newly-created calling card.
Note: If the ‘Try adding a calling card’ option doesn’t appear when you open up a contact within the Contacts app. Instead, tap the pencil icon in the top-right and tap on the image on the right side of the ‘Picture and calling card’ box near the top of the screen.
If the option still doesn’t immediately present itself, make sure the Contacts and Phones apps are fully closed, then find the Phone app in your Pixel’s apps drawer, long-press on the app icon and on the subsequent pop-up menu select ‘App info’. Scroll to the bottom of the Phone app’s App info page and under ‘Store’ tap ‘App details’.
You’ll then be pushed to the Phone app’s page on the Google Play Store. From here, tap Uninstall, and on the subsequent pop-up, tap Uninstall again. Once the app updates have been uninstalled, simply tap the Update button and wait for the Phone app updates to redownload and reinstall.
Once installed, open up the Contacts app again and follow the original instructions above. The option to add a calling card should now be available.
Check for AI-altered images with Content Credentials
The Pixel imaging experience has long been about applying machine learning to imagery to enhance the final result. However, in recent years, Google has started piling on generative AI-based image capture and editing tools, like Magic Editor’s Reimagine feature and Pro Res Zoom.
In order to combat misinformation, Google recently became a part of the Coalition for Content Provenance and Authenticity (C2PA), and one of the more practical benefits of its involvement is the addition of image provenance within Google Photos and shots taken using your Pixel 10’s camera.
Foundry | Alex Walker-Todd
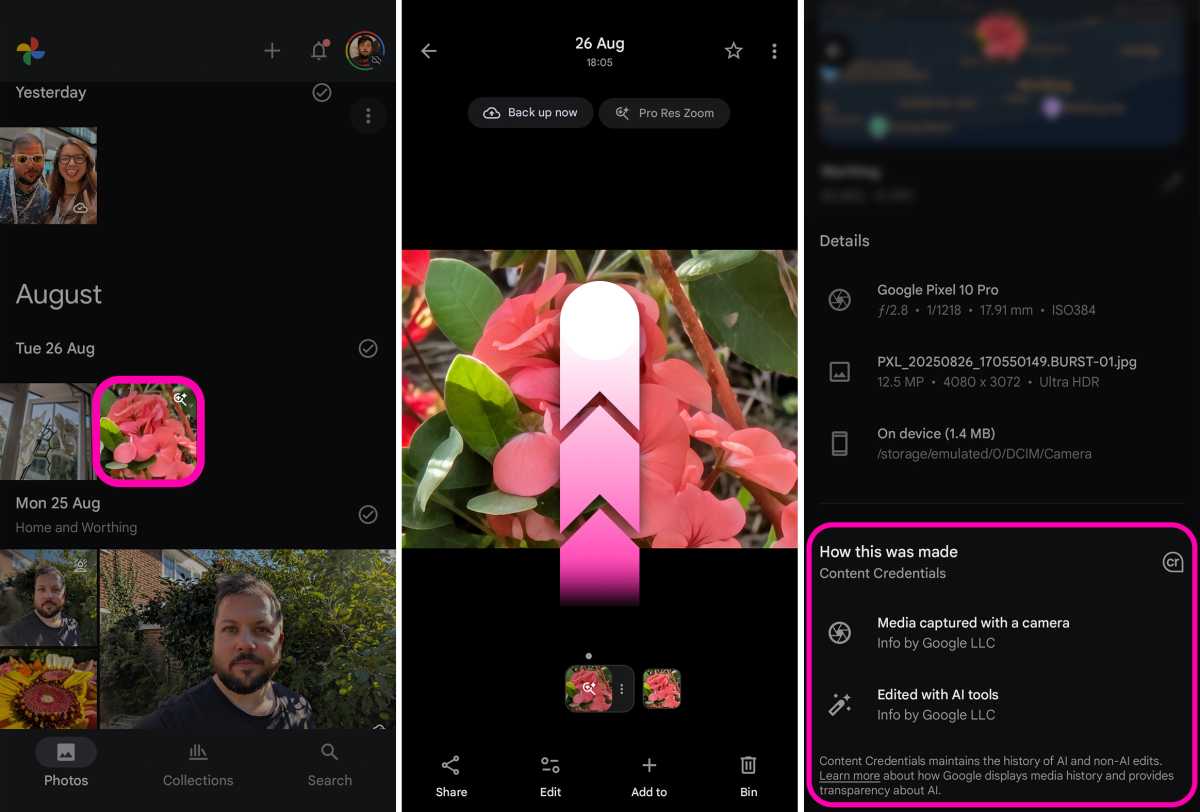
HOW? To check an image’s content credentials, simply head into your Google Photos gallery, tap on a shot you want to know more about and then swipe up to find out more about the image.
At the bottom, you should now find a How this was made section, which tells you key information like the camera the image was taken with, and, in the case of Pro Res Zoom shots bolstered by generative AI (for example), additional tags to let you know the image was “Edited with AI tools”.
Add music to your recordings with AI
Google’s native Recorder app is a great inclusion, with powerful features such as real-time transcription, but open it up on your Pixel 10 and you’ll find it’s gained a new trick: the ability to add AI-generated music. This is perfect for ideating songs or simply adding a little more pep to your voice notes.
Provided you have a recording saved within the Recorder app that’s 3 minutes or less, you can add music using only a few taps.
HOW? First, open the Recorder app on your Pixel. Next, tap on the recording you want to add music to. Once on the playback screen, tap the three dots in the top-right of the screen. On the subsequent pop-up card, tap on the new Create music option.
From here, you’re required to Choose a vibe for the style of music you want to add to your recording. You have two main options: ‘Featured vibes’ or ‘Your vibes’.
‘Featured vibes’ is a selection of five different ‘vibes’, ranging from ‘Chill Beats’ to ‘Dance party’. You also have to option to choose ‘Surprise me’, which will automatically pick one of the other ‘vibes’ for you.
The ‘Your vibes’ section is filled with musical treatments that you create. To create a new vibe, tap on the Create new vibe button, you’ll then be asked to name your vibe, select a genre and a feeling. Once you’re happy with your choices, tap Save at the bottom of the screen. You’re newly created vibe will then appear in the ‘Your vibes’ tab.
Tap on a vibe from either tab to assign it to your recording and then tap next. The Recorder app will then process your audio, looking for pre-existing rhythm and harmony that it can match music to.
Once it’s finished processing, you’ll be presented with a slightly different playback screen than before, with two waveforms.
You can tap Play at the bottom of the screen to hear your newly soundtracked recording. You can also tap on the thumbs-up or thumbs-down icons within the upper waveform to offer feedback to the AI system on whether you like its creation. You can also tap Change vibe, and the app will re-process the audio with a new vibe of your choosing.
Once you’re happy with your creation, tap Save copy in the top-right of the screen, and you’ll be taken back to the main Recorder app screen, with the list of all your recordings. Your new creation should be the new top entry, with a title that references the vibe you attached to your original recording, and an ‘AI music’ tag on the bottom-left of the entry.
As with any other recording in the Recorder app, you can then share the audio file or a link to the recording, as desired.
Note: The Recorder app automatically ducks the music when applying a vibe, meaning speech should still be wholly intelligible and its volume balanced with the new music.
You can also edit or delete vibes you created by navigating to the ‘Your vibes’ tab, long-pressing on any of the vibes you’ve created and tapping ‘edit’ or ‘delete’ on the subsequent pop-up menu.
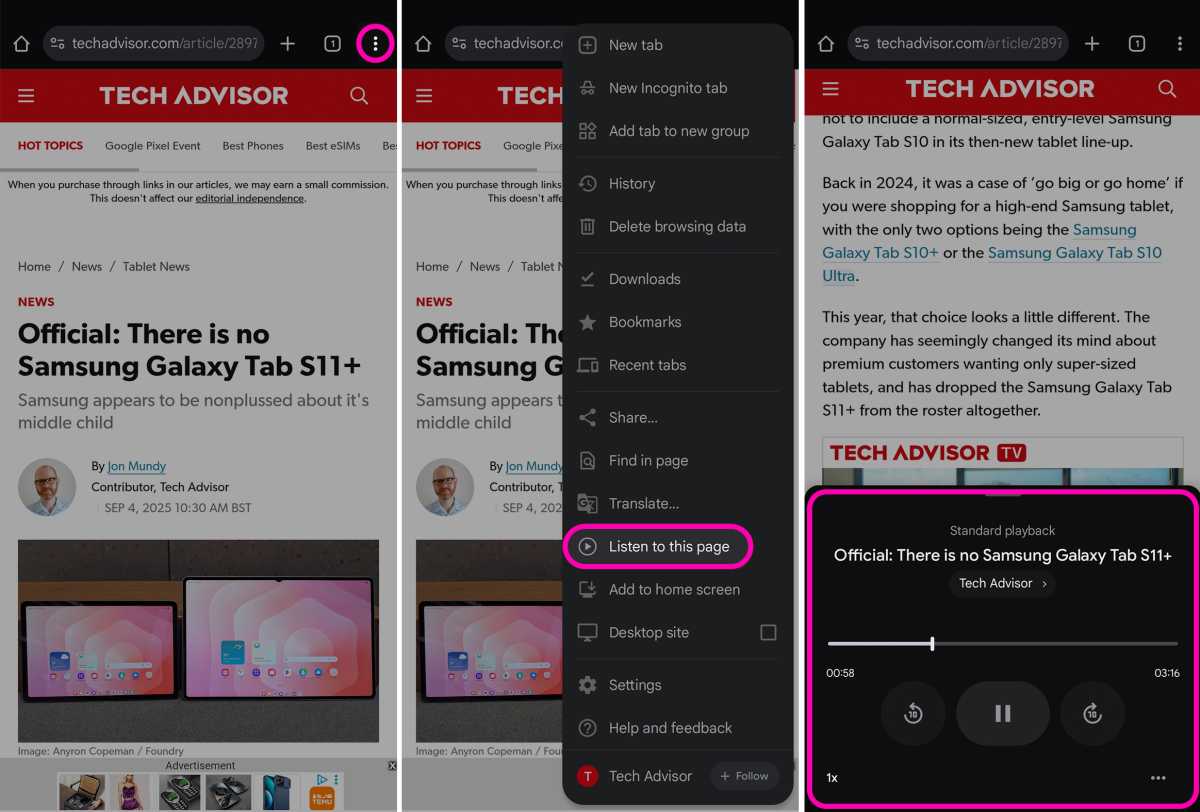
Listen to this page
‘Listen to this page’ is a great assistive tool that makes digesting web pages far more convenient, especially when you’re out and about.
Whilst reading a news story sat on the train is easy enough, reading and also looking where you’re going is infinitely trickier: that’s where ‘Listen to this page’ comes in.
Foundry | Alex Walker-Todd
So long as you can get behind the (somewhat stilted) robotic voice the feature currently uses, the phone treats the narration like any other audio playback, meaning you can still lock your phone and slip it in your pocket. You’ll still be able to listen using headphones, too.
What’s more, conventional media control support lets you pause/play and scrub through the timeline of a given web page seamlessly.
HOW? Open the Chrome web browser on your Pixel and navigate to the page you want to listen to. So long as the feature can parse what’s on-screen, you’ll find the option to have the page read out to you by tapping the three dots in the top-right. This brings up Chrome’s native settings menu, within which you’ll find the Listen to this page button, towards the bottom.
Enhanced Now Playing
Now Playing has been an impressive Pixel feature from the get-go, able to passively identify music within range of your phone’s microphones. The name and artist of any recognised track appear on the AOD (always-on display) and lock screen, so you can glance down and find out what it is you’re listening to.
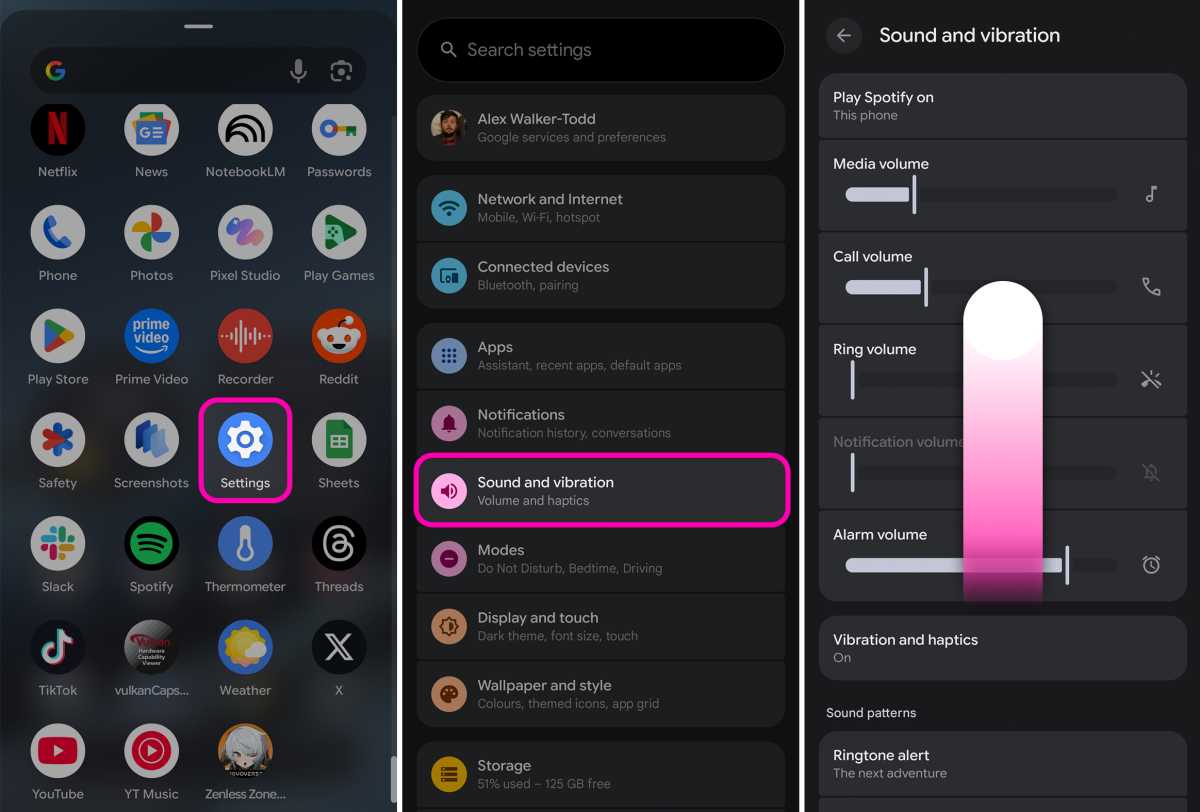
With Enhanced Now Playing – which is disabled on your Pixel 10 out of the box – Google’s added the ability for to feature to automatically source the relevant album art too. It makes it that little bit easier to recognise a particular song or artist online or on store shelves if you go seeking out a particular track for yourself.
HOW? To upgrade Now Playing to Enhanced Now Playing, open the Settings app and then tap on Sound and vibration. Next, scroll all the way to the bottom until you see Now Playing. Tap on Now Playing to open up its dedicated sub-menu screen.
Partway down, you should then see the option to toggle Enhanced Now Playing on. Once enabled, any detected tracks saved within your Now Playing History (also found within the Now Playing sub-menu) will include album art, rather than a generic musical note icon.
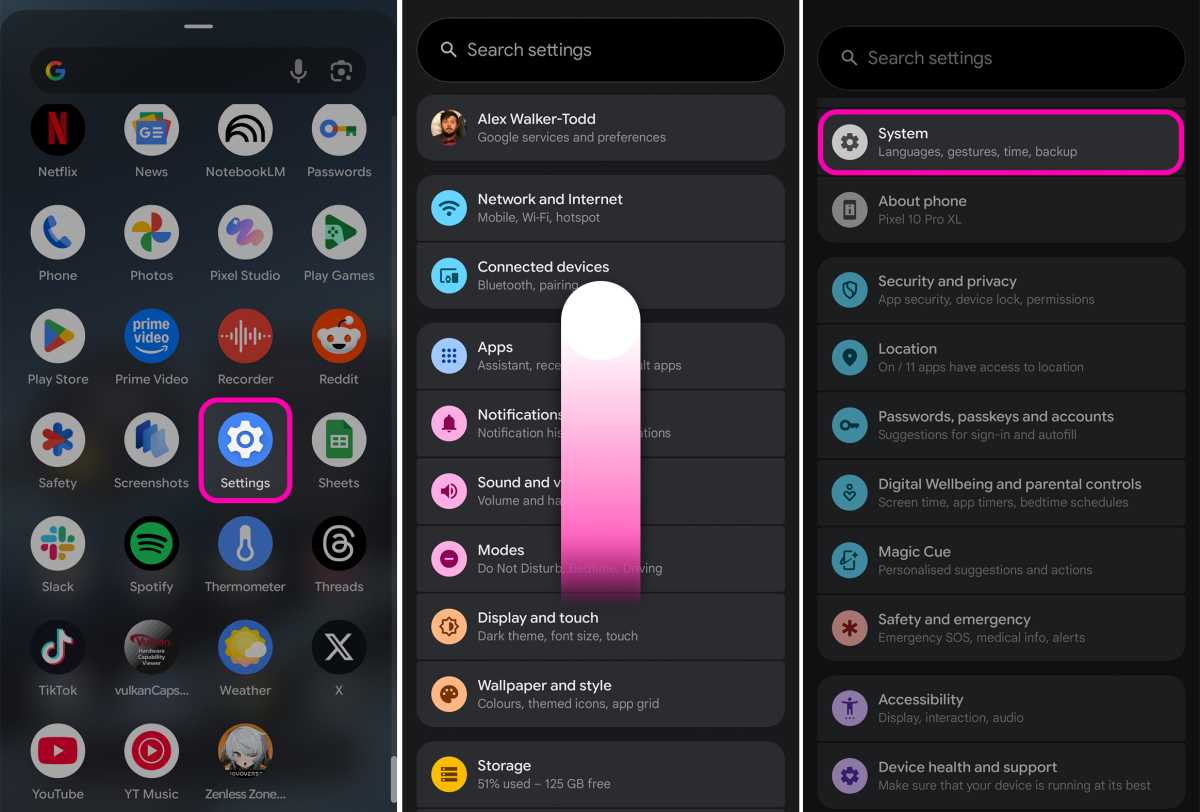
Enable Advanced Protection
With Google’s command of the online world, it stands to reason that they’re also pretty well-versed at protecting against some of its more unsavoury aspects, and that penchant for security is also present on their phones.
While not enabled out the box, the Pixel’s Advanced Protection suite does everything from enabling theft detection lock (immediately locking your phone if it thinks it’s just been snatched out of your hands by an assailant), activating Android Safe Browsing, with threat detection, warning you about suspicious links sent via Google Messages, and more.
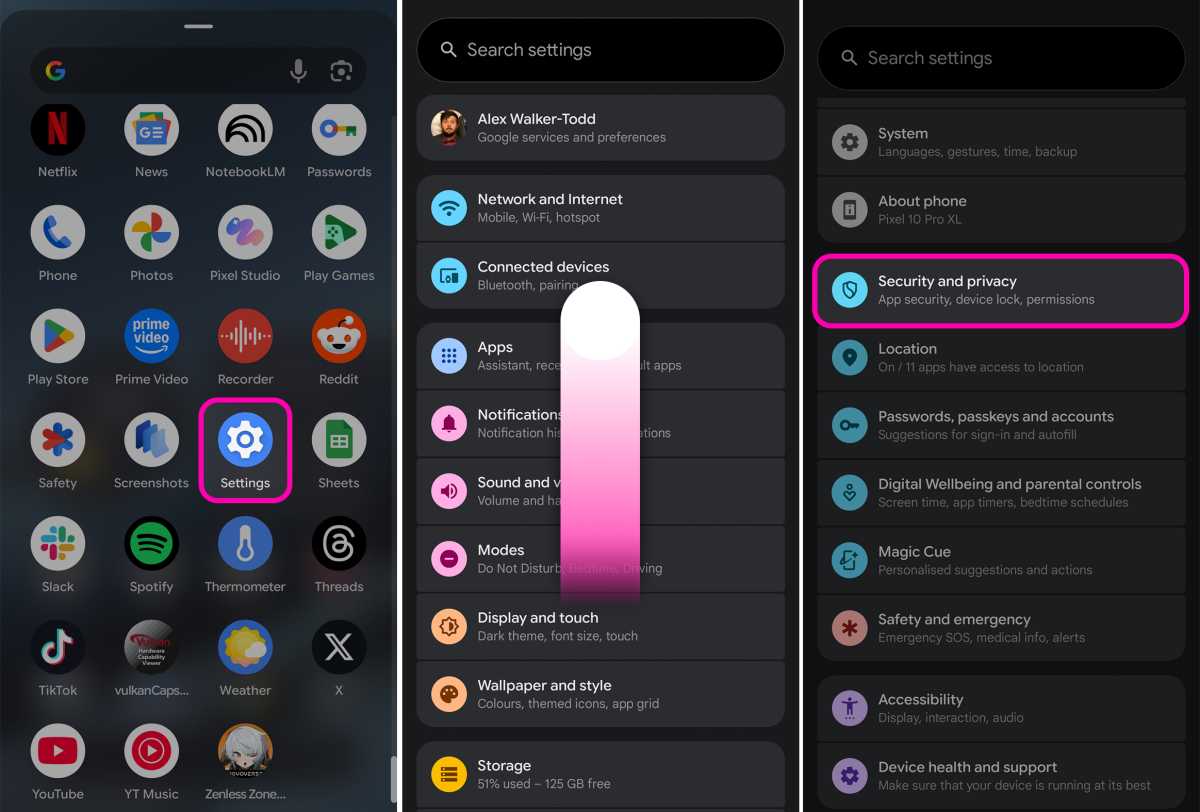

HOW? To level up the security on your Pixel, open the Settings app, then scroll down to and tap on Security and privacy. Within the Security and privacy sub-menu, under the ‘Other settings’ section, tap on Advanced Protection. On the Advanced Protection menu, all that’s left to do is to toggle on the switch to the right of Device protection option.
Empower the power button
Once upon a time, a phone’s power button was used to power the phone on and off, but in recent years, while they’re still used to turn your phone on, they’ve mostly been repurposed for other tasks, leaving multi-button configurations the only way to access that all-important power menu.
In the case of the Pixel 10 series, whilst a tap on the power button will darken your screen and lock your phone, a long-press will instead summon Google Gemini. There’s also a dedicated Gemini app, an ‘Ask Gemini’ widget pre-loaded on the home screen and the ability to activate Gemini by simply using the “Hey, Google” wake word.
All in all, Google has made sure that granting quick access to Google Gemini on your Pixel is well and truly covered, begging the question: can’t the power key just be the power key again?
If, like me, you’re over pressing power and volume up every time you want to formally switch off or restart your Pixel, here’s how to reassign the power button’s main function.
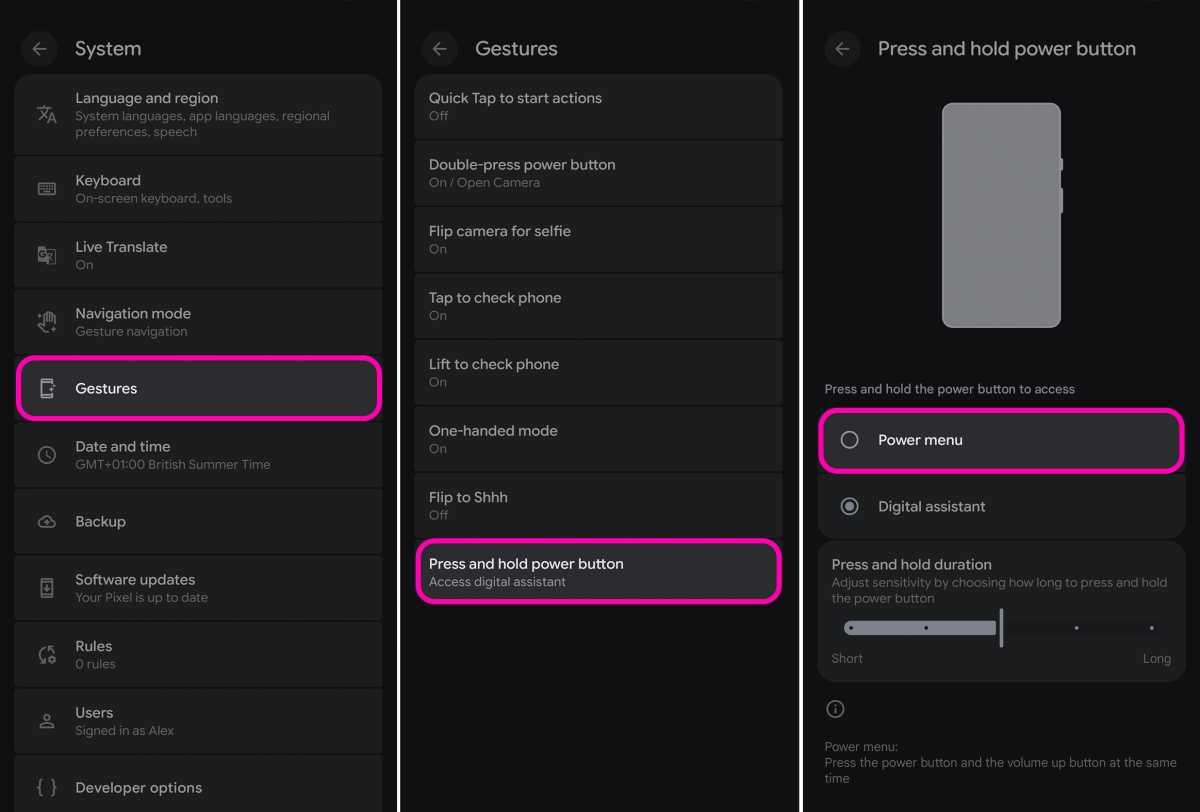
HOW? Head to the Settings app and, once open, look for System – tap on it. About halfway down the System menu, you should be able to tap on the Gestures option. At the bottom of the Gestures sub-menu, tap on the entry labelled Press and hold power button.
The subsequent ‘Press and hold power button’ screen should show you that ‘Digital assistant’ is currently selected, along with a slider that lets you define how long you need to hold the power button to summon said assistant. To disable this feature and reinstate the power key’s original functionality, simply tap Power menu. Long-pressing the power key will now bring up the power menu once again.
Note: Even with this change, power key + volume up will still also summon the power menu.
Boost display resolution & refresh rate
The Actua and Super Actua displays across the Pixel 10 series are some of the nicest on the market, but out-the-box you’re not getting the best possible viewing experience available.
Foundry | Alex Walker-Todd
There are two settings worth checking before getting stuck into living with your new Pixel: resolution and refresh rate.
Using the Pixel 10 Pro XL as an example, while the phone comes with a 6.8-inch 1344 x 2992 120Hz OLED display, chances are you’re viewing everything in ‘High resolution’ mode by default, which clocks in at 1080 x 2404.
The higher the resolution, the sharper things will look on-screen, but the greater the drain on the battery too.
Similarly, the screen serves up super-fluid 120Hz visuals out of the box where available, but this similarly comes at the expense of battery longevity. As such, if you aren’t fussed about high refresh rate viewing, it might be in your best interest to switch the feature off (which caps the viewing experience at 60Hz instead). Otherwise, leave it be.
HOW? Open your Pixel’s Settings app, tap on Display and touch, scroll down to the bottom of the list to find Screen resolution and then switch from High resolution to Full resolution, to maximise image fidelity.
Similarly, at the bottom of the Display and touch section of the Settings app, you’ll also see Smooth display. Chances are, it’ll be toggled ‘on’ by default, but you can switch it on and off as you prefer from here.


")


